
How to Move Your iPhoto Library To An External Disk
Posted by Phil Aaronson at 8:36 AM
[Update 2006-12-31] After I wrote the original tutorial using OS X alias to move the library, there are a couple easier ways to do this. First, there are some nice software packages for moving iPhoto libraries, for example, one is iPhotoLibraryManager another, iPhotoBuddy.
Second, as mentioned in the comments of this article, you can switch libraries by holding down the option key on launch of iPhoto (apparently this works in iPhoto 4 as well). So simply follow the instructions in the old tutorial for copying your library off to an external drive, then launch iPhoto holding down the option key, you should see a dialog window which looks like this:

Then select "Find Library" and point it at your new copy on the external drive and you're all set. Or you can use the alias method I outline below in my original method. The aliases should work with any version of iphoto. There's more discussion about moving iPhoto libraries here.
[Original]
At some point we all have to help out the family and play technical support. This one I did for my sister and brother-in-law who have filled their laptop's hard drive with photos of their new baby, but as long as I was doing it, I might as well post it. This tutorial is geared toward the novice non-technical user.
The plan is to move the folder called "iPhoto Library" in the Pictures folder, off to an external drive freeing up precious space on the laptop's internal drive. And just to state the obvious, this setup will cause iPhoto heartaches (read: won't work) when the external drive isn't attached to the computer so please keep this in mind.
Also a quick note about backups. If you've been keeping a backup of your iPhoto library on this same external drive, we've got a problem. The original and the backup should NOT be on the same disk, it defeats the whole point. Drives are designed to last on average 5 years, but realistically they can fail at any time. Now that we're using this external drive for primary use, it's time to go get a second external drive for backups. Do it now. You will cry. I have cried.
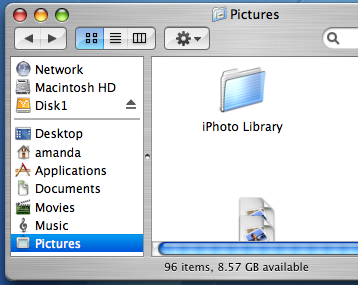
Ok, introduction over, onto moving the iPhoto Library. In my setup the external drive is oh-so-creatively called "Disk1", so everywhere you see "Disk1", mentally replace your own external drive's name. Here's my starting setup in the screenshot of my finder below. I've clicked on the Pictures folder, found the "iPhoto Library" folder inside it, and the external drive "Disk1" icon is visible on the left, meaning I've attached it and it is mounted.
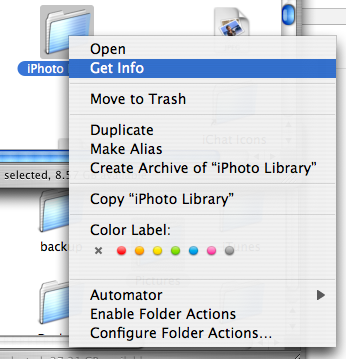
To find out how much space it's taking up on the internal drive we'll use the contextual menu option called "Get Info". To view the contextual menu right-click on the folder if you have a mouse with a right-button, or hold down the control key (it's the key entitled "ctrl" on the lower left part of your keyboard) and click if you don't. I've taken a screenshot of the iPhoto Library with the contextual menu below.
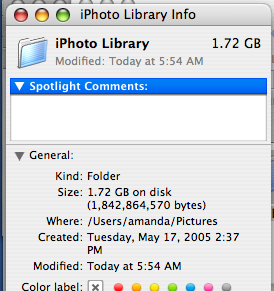
In my case, the iPhoto Library is 1.72 GB in total. It tells you on the top-right as well as next to the 'Size:' heading under the "General" heading. This is how much space we'll free up on the internal drive, and no big surprise, it's how much space we'll need on the external one.
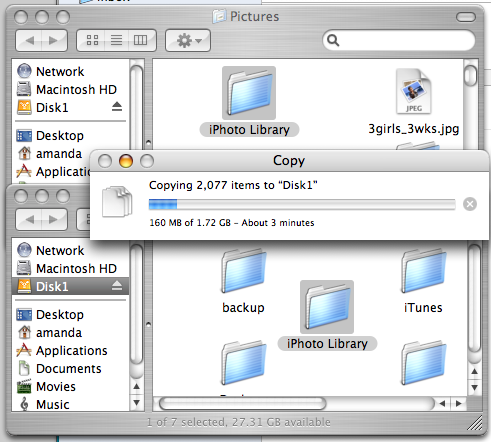
To move the iPhoto Library copy it by dragging and dropping the folder onto our external drive. You can put it anywhere on the external drive if you have some kind of organizational method to your madness. You should see a window pop up giving you progress information about how long the copy will take. In the screenshot below the internal drive's Pictures folder is on the top and the external drive "Disk1" is on the bottom.
When the copy is complete, delete the original "iPhoto Library" folder. Don't get confused by which one! You can delete the original by dragging it to the trash, or by doing the key equivalent: Apple Command-Delete. Apple-Command is the key with the sqiggly "campground" symbol on it. And you do have a backup, right?
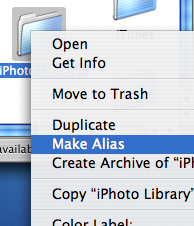
Now we want to make what's called an alias on the internal drive of the iPhoto Library folder that's on the external drive. Think of this as a placeholder at the system level, so iPhoto will be none the wiser. We'll use the same contextual menu we used earlier but instead of "Get Info" we'll go down to "Make Alias". Remember, to reveal the contextual menu you'll right-click or ctrl-click on the "iPhoto Library" folder to reveal it. Here's a screenshot when I did it.
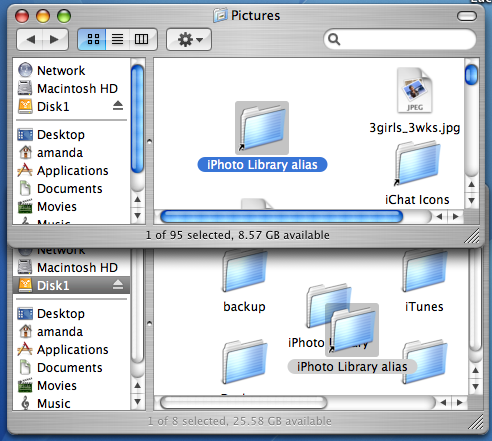
A folder called "iPhoto Library alias" will appear on the external drive. You can tell it's an alias because of the little arrow that's been added to the folder icon in the lower left. Copy the new alias folder we just made back to the internal drive in the Pictures folder, the location of the now deleted, original "iPhoto Library".
Here's a screenshot of what your computer should look like after you've copied the alias file over. The top window is the internal drive, and the bottom window is the external drive.
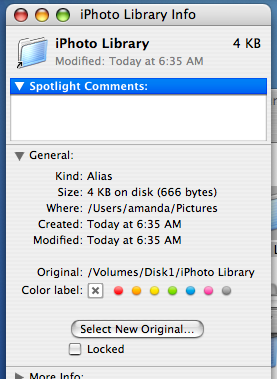
Finishing up, remove the alias from the external drive (command-delete or drag to trash) and rename the alias on the internal drive to be simply "iPhoto Library". Now we should have an alias called "iPhoto Library" on the internal drive pointing to a folder on the external drive called, well, "iPhoto Library". We can check by using the same Get Info command that we've used earlier (right-click or ctrl-click) but on the alias on the internal drive. Only this time it should tell us that the original is located at
At this point, you should be good-to-go. We've replaced a 1.72GB iPhoto Library folder with a 4KB (tiny) file that references the much larger iPhoto Library folder on the external drive. Fire up iPhoto and you should see all your pictures. To really free up space on the internal drive, empty the trash at this point.
Hope this helps!
Second, as mentioned in the comments of this article, you can switch libraries by holding down the option key on launch of iPhoto (apparently this works in iPhoto 4 as well). So simply follow the instructions in the old tutorial for copying your library off to an external drive, then launch iPhoto holding down the option key, you should see a dialog window which looks like this:
Then select "Find Library" and point it at your new copy on the external drive and you're all set. Or you can use the alias method I outline below in my original method. The aliases should work with any version of iphoto. There's more discussion about moving iPhoto libraries here.
[Original]
At some point we all have to help out the family and play technical support. This one I did for my sister and brother-in-law who have filled their laptop's hard drive with photos of their new baby, but as long as I was doing it, I might as well post it. This tutorial is geared toward the novice non-technical user.
The plan is to move the folder called "iPhoto Library" in the Pictures folder, off to an external drive freeing up precious space on the laptop's internal drive. And just to state the obvious, this setup will cause iPhoto heartaches (read: won't work) when the external drive isn't attached to the computer so please keep this in mind.
Also a quick note about backups. If you've been keeping a backup of your iPhoto library on this same external drive, we've got a problem. The original and the backup should NOT be on the same disk, it defeats the whole point. Drives are designed to last on average 5 years, but realistically they can fail at any time. Now that we're using this external drive for primary use, it's time to go get a second external drive for backups. Do it now. You will cry. I have cried.
Ok, introduction over, onto moving the iPhoto Library. In my setup the external drive is oh-so-creatively called "Disk1", so everywhere you see "Disk1", mentally replace your own external drive's name. Here's my starting setup in the screenshot of my finder below. I've clicked on the Pictures folder, found the "iPhoto Library" folder inside it, and the external drive "Disk1" icon is visible on the left, meaning I've attached it and it is mounted.
To find out how much space it's taking up on the internal drive we'll use the contextual menu option called "Get Info". To view the contextual menu right-click on the folder if you have a mouse with a right-button, or hold down the control key (it's the key entitled "ctrl" on the lower left part of your keyboard) and click if you don't. I've taken a screenshot of the iPhoto Library with the contextual menu below.
In my case, the iPhoto Library is 1.72 GB in total. It tells you on the top-right as well as next to the 'Size:' heading under the "General" heading. This is how much space we'll free up on the internal drive, and no big surprise, it's how much space we'll need on the external one.
To move the iPhoto Library copy it by dragging and dropping the folder onto our external drive. You can put it anywhere on the external drive if you have some kind of organizational method to your madness. You should see a window pop up giving you progress information about how long the copy will take. In the screenshot below the internal drive's Pictures folder is on the top and the external drive "Disk1" is on the bottom.
When the copy is complete, delete the original "iPhoto Library" folder. Don't get confused by which one! You can delete the original by dragging it to the trash, or by doing the key equivalent: Apple Command-Delete. Apple-Command is the key with the sqiggly "campground" symbol on it. And you do have a backup, right?
Now we want to make what's called an alias on the internal drive of the iPhoto Library folder that's on the external drive. Think of this as a placeholder at the system level, so iPhoto will be none the wiser. We'll use the same contextual menu we used earlier but instead of "Get Info" we'll go down to "Make Alias". Remember, to reveal the contextual menu you'll right-click or ctrl-click on the "iPhoto Library" folder to reveal it. Here's a screenshot when I did it.
A folder called "iPhoto Library alias" will appear on the external drive. You can tell it's an alias because of the little arrow that's been added to the folder icon in the lower left. Copy the new alias folder we just made back to the internal drive in the Pictures folder, the location of the now deleted, original "iPhoto Library".
Here's a screenshot of what your computer should look like after you've copied the alias file over. The top window is the internal drive, and the bottom window is the external drive.
Finishing up, remove the alias from the external drive (command-delete or drag to trash) and rename the alias on the internal drive to be simply "iPhoto Library". Now we should have an alias called "iPhoto Library" on the internal drive pointing to a folder on the external drive called, well, "iPhoto Library". We can check by using the same Get Info command that we've used earlier (right-click or ctrl-click) but on the alias on the internal drive. Only this time it should tell us that the original is located at
/Volumes/Disk1/iPhoto Library (or wherever you put yours). See it, down a bit under the "General" heading?) Confused? Hopefully not.At this point, you should be good-to-go. We've replaced a 1.72GB iPhoto Library folder with a 4KB (tiny) file that references the much larger iPhoto Library folder on the external drive. Fire up iPhoto and you should see all your pictures. To really free up space on the internal drive, empty the trash at this point.
Hope this helps!
![]()

48 Comments:
Great tips! Worked like a charm!
Wow! Thanks so much. I think you just saved my hard drive from crashing! Question...when you load additional pics, how do you go about getting them on the external? Do you use the same process after it fills up on the internal?
I should have been more clear, this moves your iPhoto library off of the internal drive. As you add more pictures they'll be stored on the external drive.
The big downside here is that once you move your iPhoto library, it will only work with the external drive attached.
Hi Phil-
Everything copied well except the Albums. None of them will copy over, it gives me an error of "one or more items can not be copied...". When I look in the album directories it looks like there are only .jpg files there. Not sure what gives.
Thanks.
Bob
Huh, that is strange.
Couple thoughts. First, the simplest, make sure you've quit out of iPhoto before you attempt the copy.
My second thought is to check the permissions on the file that won't copy. In finder, if you navigate to that file. Right click (ctrl-click) on it, and pull down to 'Get Info'. Then in the resulting Info window, the last tab is 'Ownership and Permissions' open that up and make sure it's set to 'Read and Write'.
Hi Phil,
I've moved my iphoto library over to an external drive LaCie 300, I made the alias, replaced the old iphoto library in the internal drive with the alias, renamed it, but... when I open iPhoto it doesn't read the library in the LaCie and says there are no photos in the program. What am I doing wrong? I still have my old iPhoto library in the trash.
Thanks for the help.
Peter.
Couple things, first make sure that the copy you created of your iPhoto library on the external drive has something in it. Secondly double check your alias, is it pointing to the right place, or did you accidentally make an alias of the original folder? You can check by using the get info command. You can also check by double clicking on the alias folder, it should take you right to your photos on the external drive.
Hi Phil,
Thanks for the advice. I can open my pictures by going to the alias and clicking on that and then directly on the photos. They open in the Preview program but I can't get them to open in iPhoto.
Everything looks in order otherwise.
Peter.
Phil,
Just an update. I'm so lame. I realized that, even though the instructions claimed I did not have to do anything but plug the external drive in after I bought it, it was formatted incorrectly. I reformatted it to Mac OS extended (journaled) and all is swell now.
Thanks for the help. Your steps worked perfectly after fixing this rookie problem.
Peter.
Glad to hear it worked finally. I had run out of ideas!
Instead of making an alias:
1. When you start iPhoto, hold down the option key.
2. A dialog box called "Chose Photo Library" will come up.
3. Click on "Choose Library."
Navigate to the iPhoto Library on the external hard disk.
4. Click on the "Open" button, which should be named "Choose"
After all that you should be good to go. You only have to do this once. Iphoto will remember the new location.
Nice! Thanks for the tip!
Does this process also export the Albums(left panel of iPhoto)to the external drive?
I don't want to lose all the information I have on teh pics (all the albums that keep them organized on iPhoto).
thanks...
also, how can I make my external hard drive be "writable" for both macs and pcs? (right now I can only "read" it on macs, works fine on pcs though).
thanks
Enzo, I believe OS X can read and write to FAT32, and only read from NTFS. You might try reformatting the drive to FAT32 and see if that works?
Thanks...super helpful....very kind of you to share your expertise!
This is a very helpful and well written tutorial. Using your guide I just moved 2 iPhoto libraries with about 30 Gb of pictures without fear of losing them. Thanks a lot!
Great! I'm glad it's been helpful!
Thanks for the clear and simple instructions! I have been putting this off for 6 months now -- scared that my projects in iPhoto would corrupt. But it worked perfectly! And FINALLY I can import more photos. A HUGE thanks!!!!
Thank you Amanda! You made it easy for me to move my iPhoto Library to my external drive, saving me from replacing my 1999 iMac G3 400 DV SE for a few more months. Great work!
Tim
Thanks so much for your tips! Very clear and concise instructions.
Sean in Seattle
Hello,
I'm having some trouble with this operation. Your instructions are very clear but something seems to be wrong. First I followed a different tutorial and copied, moved and deleted 'iphoto library' and then tried to choose the library when prompted by iphoto. But when I try to click 'open' iphoto library it just keeps opening the folder to the folders contained and nothing can be selected. So, I followed your tutorial created the alias and still iphoto shows "no photos". Still trying to choose a library to tell it to use the alias and again no 'choose' option appears only open, open, open...but nothing happens. Is this at all clear? Sorry, I'm at the confused, what did I do? part of the process. Could my harddisk not be formatted to a mac (it was being used for a PC before? and how do you do that?
Thanks for your help...
Woah, yes. You'll definitely want to format the disk for Mac. Just remember reformatting the drive will erase everything on it, so be sure to move anything you need off that drive first (like all your photos).
How to properly partition/format a drive is a bit beyond the scope of this article. But here is a really nice tutorial called Formatting & Partitioning a Hard Drive in OS X - Tiger and Leopard on how to use the Disk Utility tool to format a drive or partition. I recommend working through that.
Phil
Hi Phil,
I saved my entire library on an external about a year ago, but I didn't delete any of the photos from the original library. It was meant to be just a back up, but now that my computer is almost out of room, I would like to move more photos to the external, and then delete specific photos from the library. How would I do this?
sorry phil, let me elaborate. I am trying to save additional photos without overriding the 1st backup I preformed. Sorry for the confusion.
I'm sure you have your reasons, but just to restate the obvious, making a complete backup usually is better.
But like I said, I'm sure you have your reasons. I'm not sure this is the best way to do this, but what I would probably do is create an empty folder, and export the pictures that you want to move to the backup there (select the pictures, then File -> Export).
Use the option-on-startup trick to select the backup library as your main library. Then Import the exported pictures from that folder, or just drag and drop them into the backup library. Finally use the option-on-startup trick to reselect the main library and keep right on going.
Thank you so much for the easy instructions! Worked perfectly! No more messages like "your startup disk is almost full"...hooray!
This is wonderful...now I'd like to do the same thing with my iMovie CLips. I want all my iMovie clips to be stored on an external haqrd drive but they always end up in my Movies folder in my User Folder on my computer hard drive.
( what I'm trying to do is have the complete library of viddeo clips I have taken the past ten years and have them at my diposal to make different IMovies for different family memebrs..please let me know if I can divert iMovie clips to an external hard drive at cipollinij@yahoo.com
Hi Phil,
Great article. Thanks.
I was wondering if you or your readers could answer a Mac <-> PC question I have.
I want to back up a 32GB iPhoto library from my wife's iMac to an external drive (NTFS) attached to my Windows Box.
I enabled the Windows Sharing on the iMac and am able to access the iPhoto library from my windows pc using explorer.
Now I need the external drive to remain NTFS formatted. I read online that Macs can read but not write to NTFS. So by using a windows PC as an intermediary, I should be able to copy over the iPhoto library folder to the NTFS external HDD. Then when I need to restore this backup, I can hook up the HDD to the iMac and copy over the iPhoto library folder.
My question now is would Windows make a good copy of the data in the iPhoto library? I am a mac novice so I am a bit concerned that the windows explorer will not be able to copy over systems files that might be within the iPhoto library folder.
I can try it out but copying over 32 GB worth of data is going to be pain - so I figured I will ask first.
Thanks in advance.
To be honest I haven't tried copying an iPhoto library to NTFS and back again to see if it would work. There are definitely features in HFS+ that are not going to make the transition. You could give it a shot, but I'm not sure I'd go that route with my pictures.
A possible alternative is to create yourself a disk image. You'll need free space on your Mac's drive equivalent to your iPhoto library, but assuming you have that this'll work great.
Fire up Disk Utility, it's in the Utilities directory, under Applications. Click on New Image, and set the size large enough to hold your iPhoto library. You can even encrypt it if you want. Once you create it you'll see two things, a dmg file, and a new "drive" on your Mac that corresponds to the dmg file. Copy your iPhoto library into that new drive, and when you're done eject it in the Finder.
Now you can copy the dmg file onto NTFS (and remove it from your local drive), and your entire library will be contained inside, safe from any NTFS/HFS+ incompatibilities.
Great idea. I will try it out.
Thanks again.
Wonder if you can help me with these:
1)From Finder, I cannot see the photo files (eg .jpg), the only thing I can see is the iPhotoLibrary in grey which I cannot access. What can I do if I need to browse a file to post on the web for ex.?, and
2)I have .mov files in my iPhoto library which I cannot access from iMovie. I cannot import them either (in grey again) and I cannot make them to shered between the two programs (iphoto and iMovie). Is there a way these files can be shared by both applications?
Thanks
Great Tutorial, easy to follow..
You can delete that 4kb alias and let i photo load the REAL library on the external harddrive..
Here's Tutorial on how to keep your iPhoto Library Safer with use of RAID 1
,
Great article.
I hope somebody can help me with this
I moved my iPhoto library to an external drive and everything seems to be working well in the iPhoto environment: labels, albums, etc. The problem now is that I can't sync my iPhone because iTunes doesn't "see" the library. Nor I see the library in iMovie
¿Any clues?
Thanks!
Alberto
hi phil, i spilled water on my macbook and was lucky enough to save my hard drive. im transferring everything to an external drive, and have done wat you said. i have the "iPhoto Library" folder copied and saved. but wat about the albums, i dont want to have to import 5000+ photos and not have their albums.. wat do i do?
thanks, sam
You won't be importing the 5000 images, you'll just be running the iPhoto library from your copy. Should have all your albums etc, just as you left them.
ohh thanks!!!
but when i import, wont i have to import all the originals? which is the 5000 photos?
There is no import step. Copy your old iPhoto library off the old disk into the new location, wherever that might be. Then start iPhoto with the option key held down and point it at the newly copied library. That's it, there's no import, unless I'm missing something.
I have a related question. I'm moving my photo library to my labtop. Have burned the disk with 1250 photos. The disc SAYS there are 1250 photos, But when I go to import them into my empty library in the laptop, it says it's importing 2500 photos and when finished there are doubles of everything. Any advice?
Were these pictures you exported from iPhoto? I know some formats contain multiple versions of an image, thumbnails etc. Are the duplicates the same size? I suspect either one is much much smaller than the other, or one is raw, and the other jpg.
Thanks for the response. It was an iPhoto to iPhoto transfer, and they appeared, in the library anyway, to be the same size. I didn't compare the files when I loaded them in the first time - and have since deleted them all. I'll scour the DVD where I stored them and see if they're there twice somehow. As I said, when I look a the disc it says 1250 photos, but when I go to import it says...importing 2500 photos. Wierd. I COULD delete every other one, but I thought....there MUST be a better way! :-)
Okay - I've checked out the files and there are 3 folders. "Data", "Originals" and "Modified". I can see the Data folder holds small files of the Originals, which would be thumnails I guess? But all show up the same size in the library. So that explains that. I guess I should be moving the contents of the folders on the disc to the comparable folders in the finder window instead of just dragging the contents of the disc into the library.
I have a question related to this thread--I want to use one of my external drives as a BACK UP (or maybe two for the back-up since I have had the "back-up" crash before)--not as the place where iphoto lives. I have dragged the entire library over to the ehd. Now, when I want to back-up new pics, how do I do that? Do I have to drag all the folders (originals, modified, data) to the ehd? Or, will just originals and modified be enough? And what about all the other stuff in the iPhoto library folder (Dir.data, ThumbJPGSegment.data, etc). I know that is part of iPhoto's organizational system, but do I need to back that up each time I add new photos too? I hope this post makes sense....Thanks for any help.
Lorie
If you drag and drop, yes it will copy everything over again. There are ways of doing what you want. I don't know how comfortable you are with the command line, but if you are check out rsync. If you're not there are products which will do this, though I haven't really looked into them, I use rsync. I used to use rsync for all my backups, but I recently switched to Time Machine.
My old backup script essentially ran this command:
$ rsync -aE --delete --exclude "/aaronson/Library/Caches/**" --exclude "/aaronson/.Trash**" --exclude "/aaronson/tmp**" --exclude "/aaronson/Corporate\ WinXP\ Pro\ VM**" --exclude "/aaronson/Movies/**" ~ /Volumes/Disk3/backup
The '~' is saying copy everything in my home directory to /Volumes/Disk3 my remote disk. All the --exludes are directories I don't want copied. Please be careful with this command, it's easy to clobber whole swaths of your disk if you're not careful. Always run with the --dry-run option first. It will only copy files that are new, or have changed. The --delete option is saying, if a file has been removed, remove it from the backup as well.
Again, if you're not comfortable with the command line, and Unix in general, DO NOT USE THIS. You have been warned.
Thanks, Phil. I am not familiar with coding and I don't have Leopard. Is there any way to do it myself without those? And, without the coding???
Well, my suggestion would be a nice piece of software. I've heard good things about SuperDuper you might give them a try. They appear to have incremental backup, and support 10.4. And $27 is a very reasonable price for backup software.
Hey phil, thanks for the info. Very helpful. I moved my Iphoto library to my external dive and deleted the original. then I opened the iphoto and the window came up to choose a library and I Chose the copy I put on the external dive and it pulls up my pics and it works great. Do I still need to do that alias stuff?
Nope, you don't need the alias. Though it won't hurt anything.
Post a Comment
<< Home